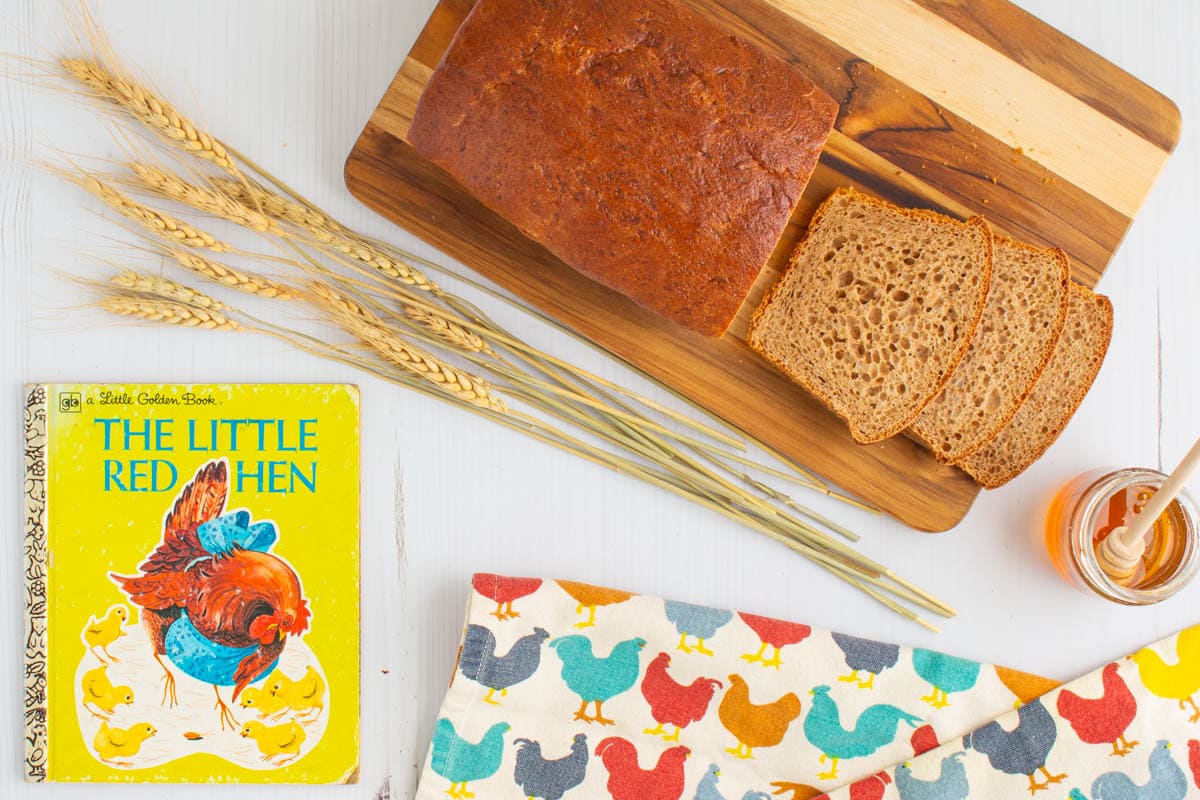
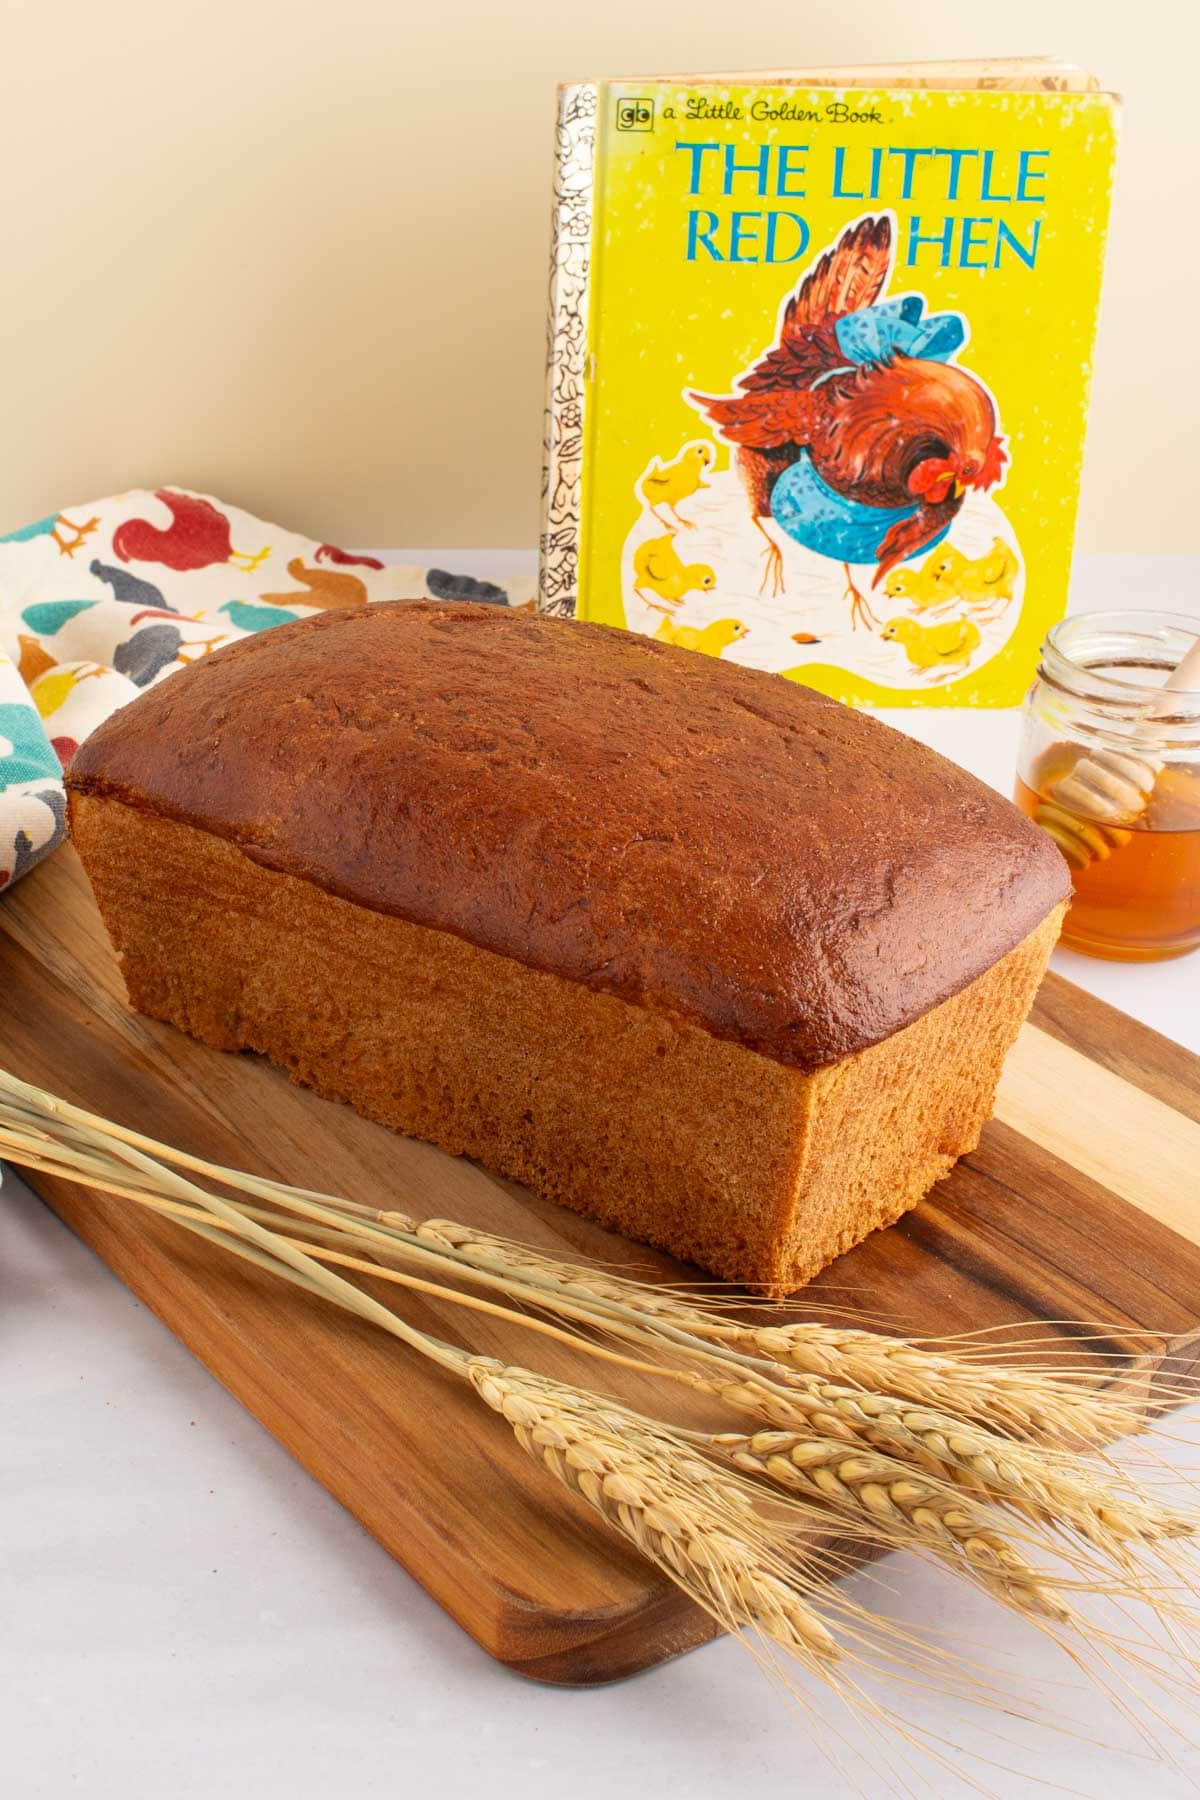
A little bit of work and some patience are their own reward with this Easy Honey Wheat Sandwich Bread that’s inspired by The Little Red Hen. The real question is: Who will help you eat it?
I've always been a hardworking, self-reliant, Yankee New Englander type, so it's hard to know whether that's why I have affection for stories like The Little Red Hen, or whether stories like it are why I am this way in the first place. (There's a chicken and egg pun in here somewhere, I'm sure.)
It seems that I'm in good company, as this simple folktale is one that lots of folks asked me to develop a recipe for. And it's easy to see why! Along with its morals about effort and teamwork, it's also a peek into how wheat becomes bread, which is a fascinating process for readers and eaters of all ages to consider.
About The Little Red Hen
The Little Red Hen has its origins as an English and Irish folktale. It was adapted and retold for American audiences in 1874 by Mary Mapes Dodge (author of Hans Brinker) in an edition of St. Nicholas Magazine, a children's periodical. In 1918, children's author and illustrator Florence White Williams published The Little Red Hen as a picture book, which became very popular (and was recently remastered in a new edition). Countless other authors and illustrators have returned to this tale ever since to give it their own spin, including my vintage 1973 Little Golden Books edition by Evelyn M. Begley and a version written and illustrated by Caldecott medal winner Jerry Pinkney.
In the story, an industrious mother hen finds a grain of wheat in the barnyard and decides she wants to turn the wheat into bread. She travels around the farm asking other animal friends to help her with each step, but each one refuses in favor of doing something more fun. In the end, she takes on each task--planting the wheat, reaping it, grinding it into flour, and baking it into a loaf of bread--all on her own. But, when it comes time to eat it, suddenly her friends are eager to help! The Little Red Hen only shares the bread with her chicks (or, in some versions of the story, eats the whole loaf by herself, which I love), leaving the others to regret not helping earlier.
Recipe Inspiration
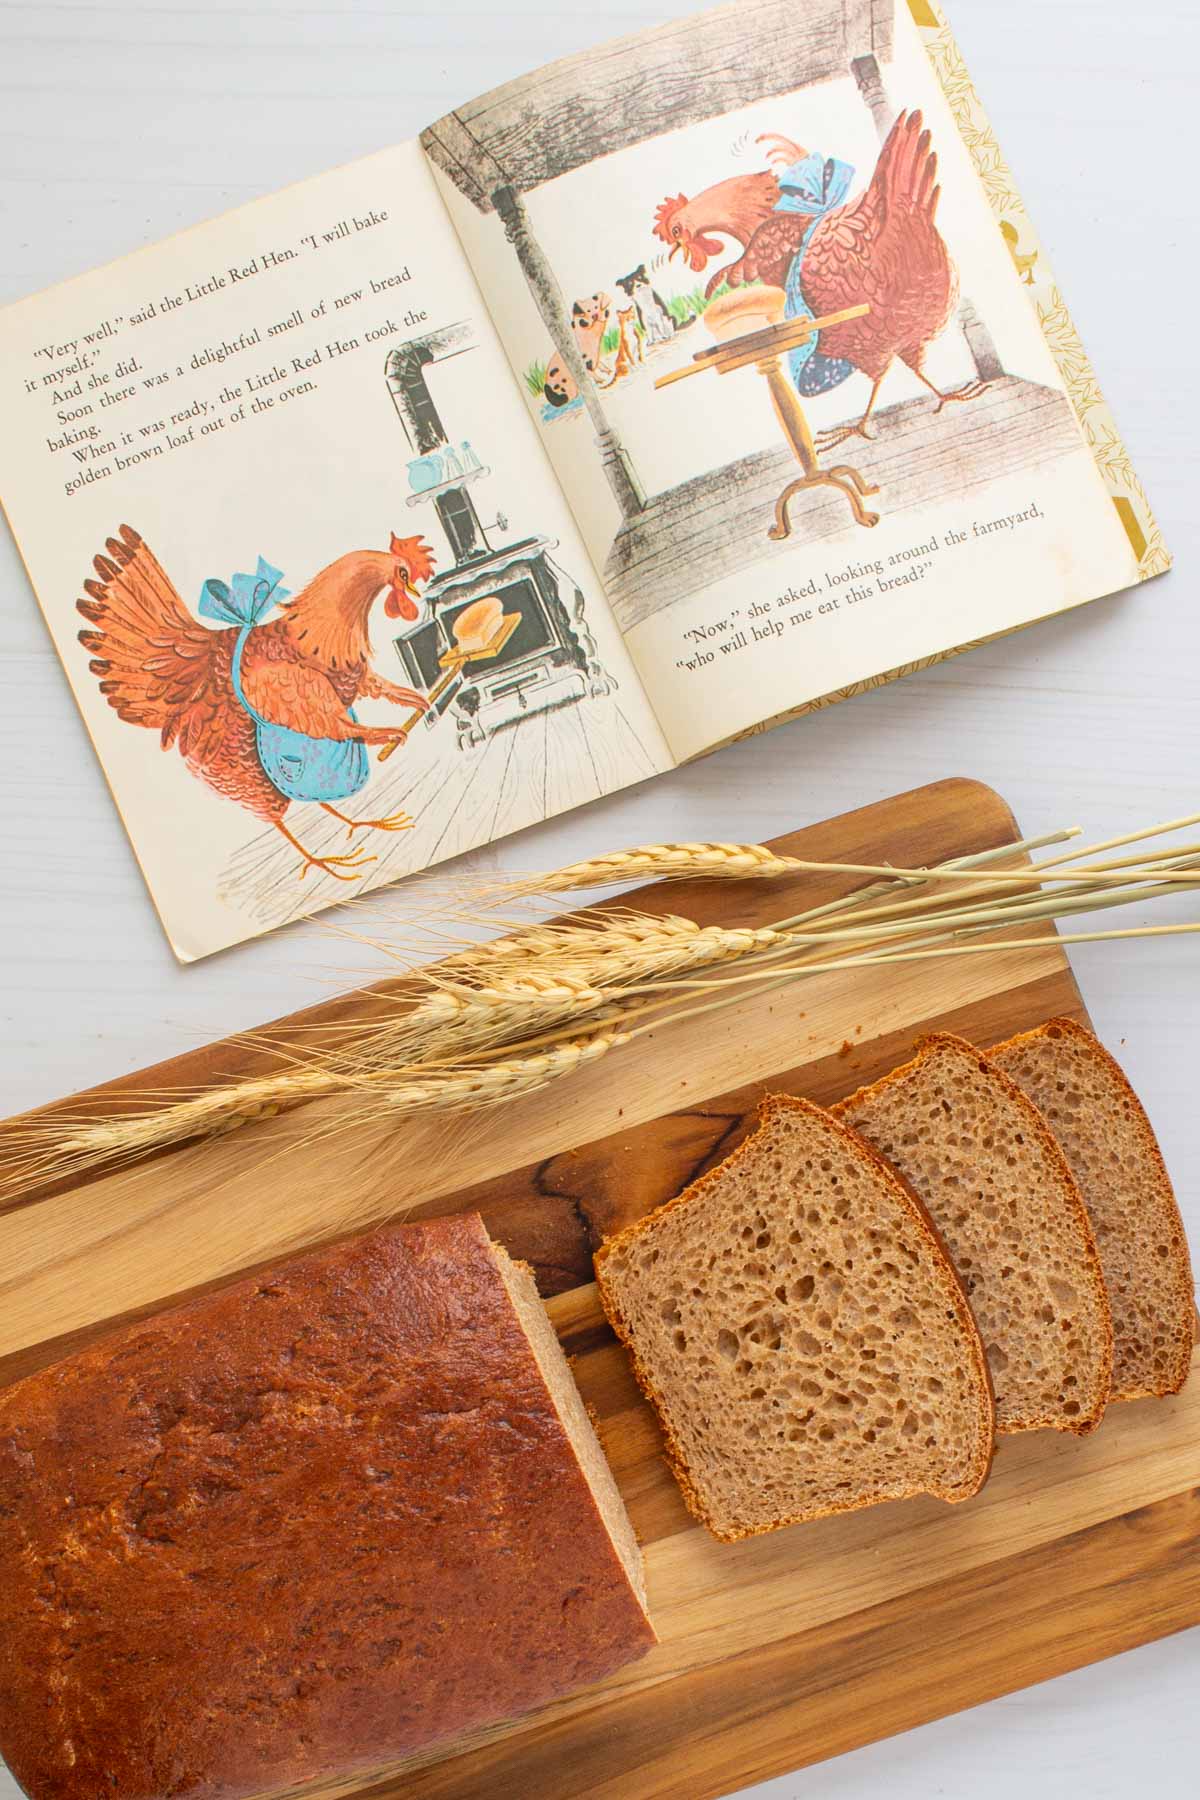
"Very well," said the Little Red Hen. "I will bake it myself." And she did. Soon there was a delightful smell of new bread baking. When it was ready, the Little Red Hen took the golden brown loaf out of the oven.
The Little Red Hen, as told by Evelyn M. Begley
The task here was clear: a lovely golden-brown loaf of wheat bread! I love baking bread, and got hooked on it when I worked on recipes for Bread Illustrated at America's Test Kitchen. But bread can be tricky to make for less experienced bakers, and whole-wheat bread in particular can turn out leaden and dry. My goal was to create an ultra-easy recipe for even the youngest of bakers, full of wheat flavor but still light and moist inside.
Luckily, my friend and colleague Andrea Geary gave me a head start with a recipe for Easy Sandwich Bread that she developed for Cook's Illustrated magazine back in 2014. It's a batter-style bread that's kneaded with a mixer's paddle instead of a dough hook. That aggressive mixing, along with lots of water and extra yeast, creates a pourable dough that rises quickly. With no need for complicated shaping (you just pour it right into the a loaf pan!) and a fast turnaround, I knew this was a great starting point for a recipe for kids and beginning bakers.
In my version, I knew wheat flavor needed to take center stage, so I increased the whole-wheat flour by quite a lot. But I kept some high-protein bread flour in the mix as well, which helped the loaf to keep its structure and prevented the bread from getting too dense.
I love the combination of wheat and honey together as flavors, so I knew I wanted to increase the honey in the dough as well. However, even though yeast needs some sugar to create the carbon dioxide gas that causes bread to rise, adding too much sugar to a bread dough can actually slow things down. Sugar is hygroscopic, meaning that it absorbs water. Yeast also needs water, so adding too much sugar or salt (also hygroscopic) to a bread dough robs the water from the yeast, slowing down fermentation. To compensate for the extra honey, I also added extra water to the dough, which sped things up again. And while my version needs a little more time to rise than the original, I felt it was worth it for the extra boost of honey flavor.
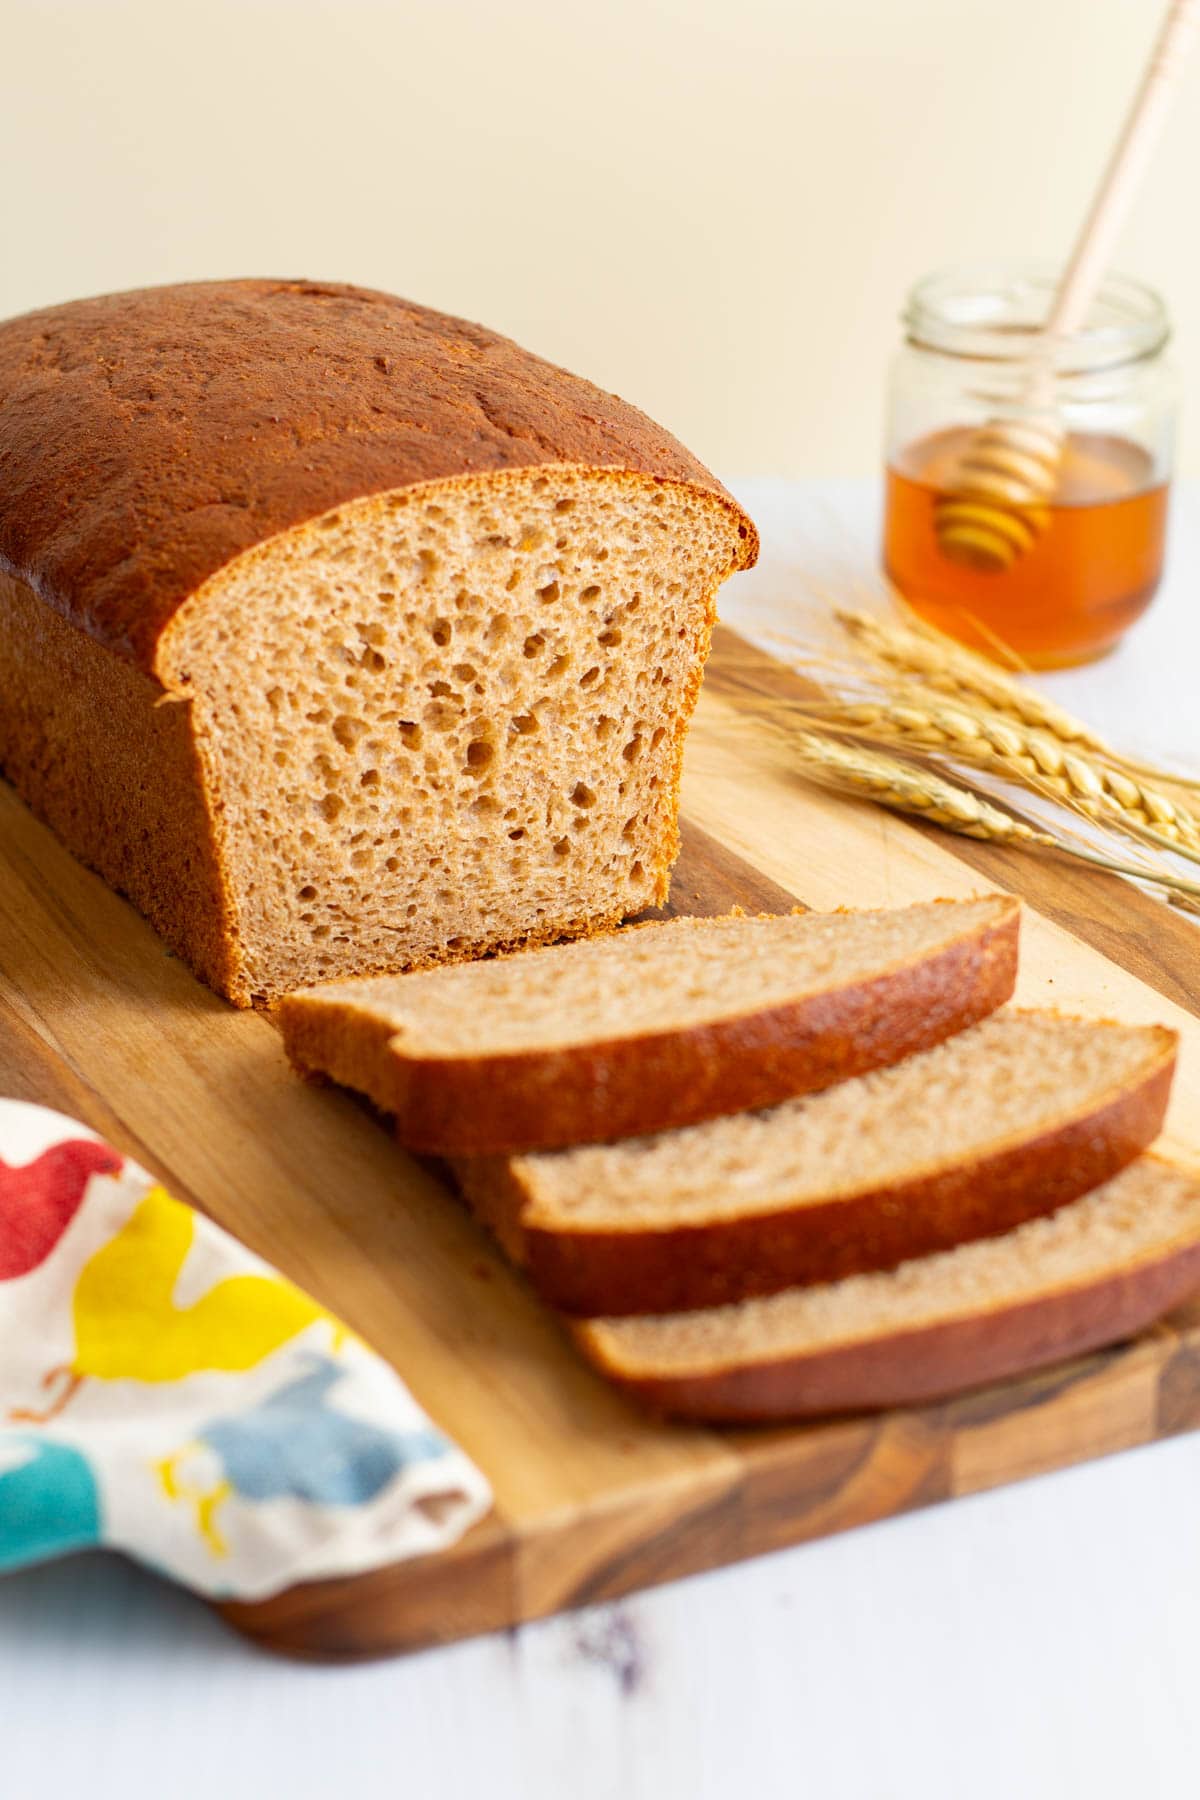
I chose to streamline the method just a little bit as well to keep it as easy as possible for kids, taking the dough straight from the mixer to a greased loaf pan for just one rise instead of two before baking. (I'm sure it would be even better with an autolyse and two rises per Andrea's original recipe, but I went for ease here!) With a glossy egg wash on top, the loaf comes out a deep, burnished golden brown with a sweet honey-wheat flavor and heavenly aroma. It's worth the (not even hard) work that it takes to make, and would be delicious slathered with Wild Maine Blueberry Jam or served alongside a hearty bowl of Dutch Oven Beef Stew.
Ingredients You'll Need
To make this Easy Honey Wheat Sandwich Bread, you'll need:
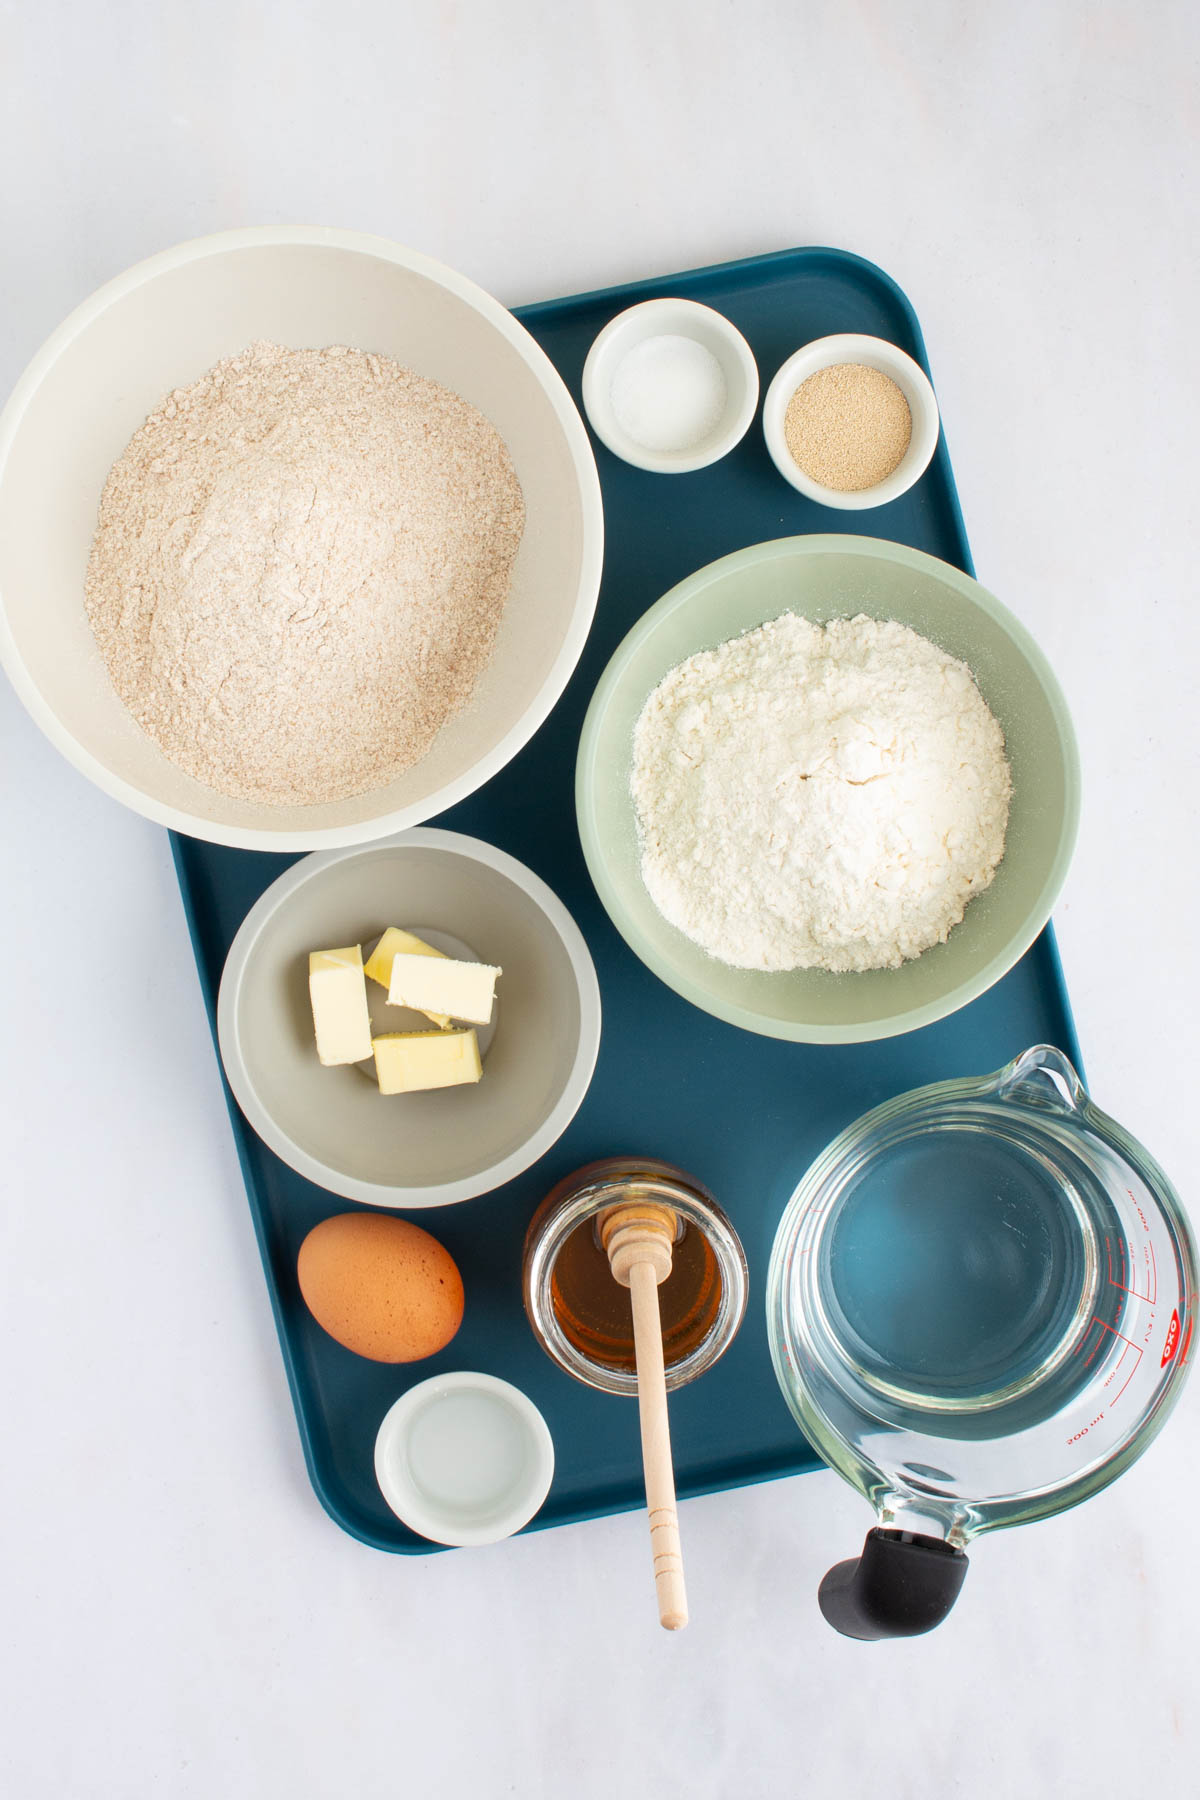
- Whole-wheat flour
- Bread flour
- Instant or rapid-rise yeast (not active dry yeast, which works differently!)
- Table salt
- Water
- Honey
- Unsalted butter
- Cooking spray
- An egg
As with every recipe, before you start cooking, make sure to measure out and prepare your ingredients ahead of time. Then, you'll have everything you need when you need it! For all of the ingredient measurements and details, see the recipe card below.
How To Make Easy Honey Wheat Sandwich Bread
The full recipe with detailed timing and instructions is below, but here are some key moments to look out for along the way:
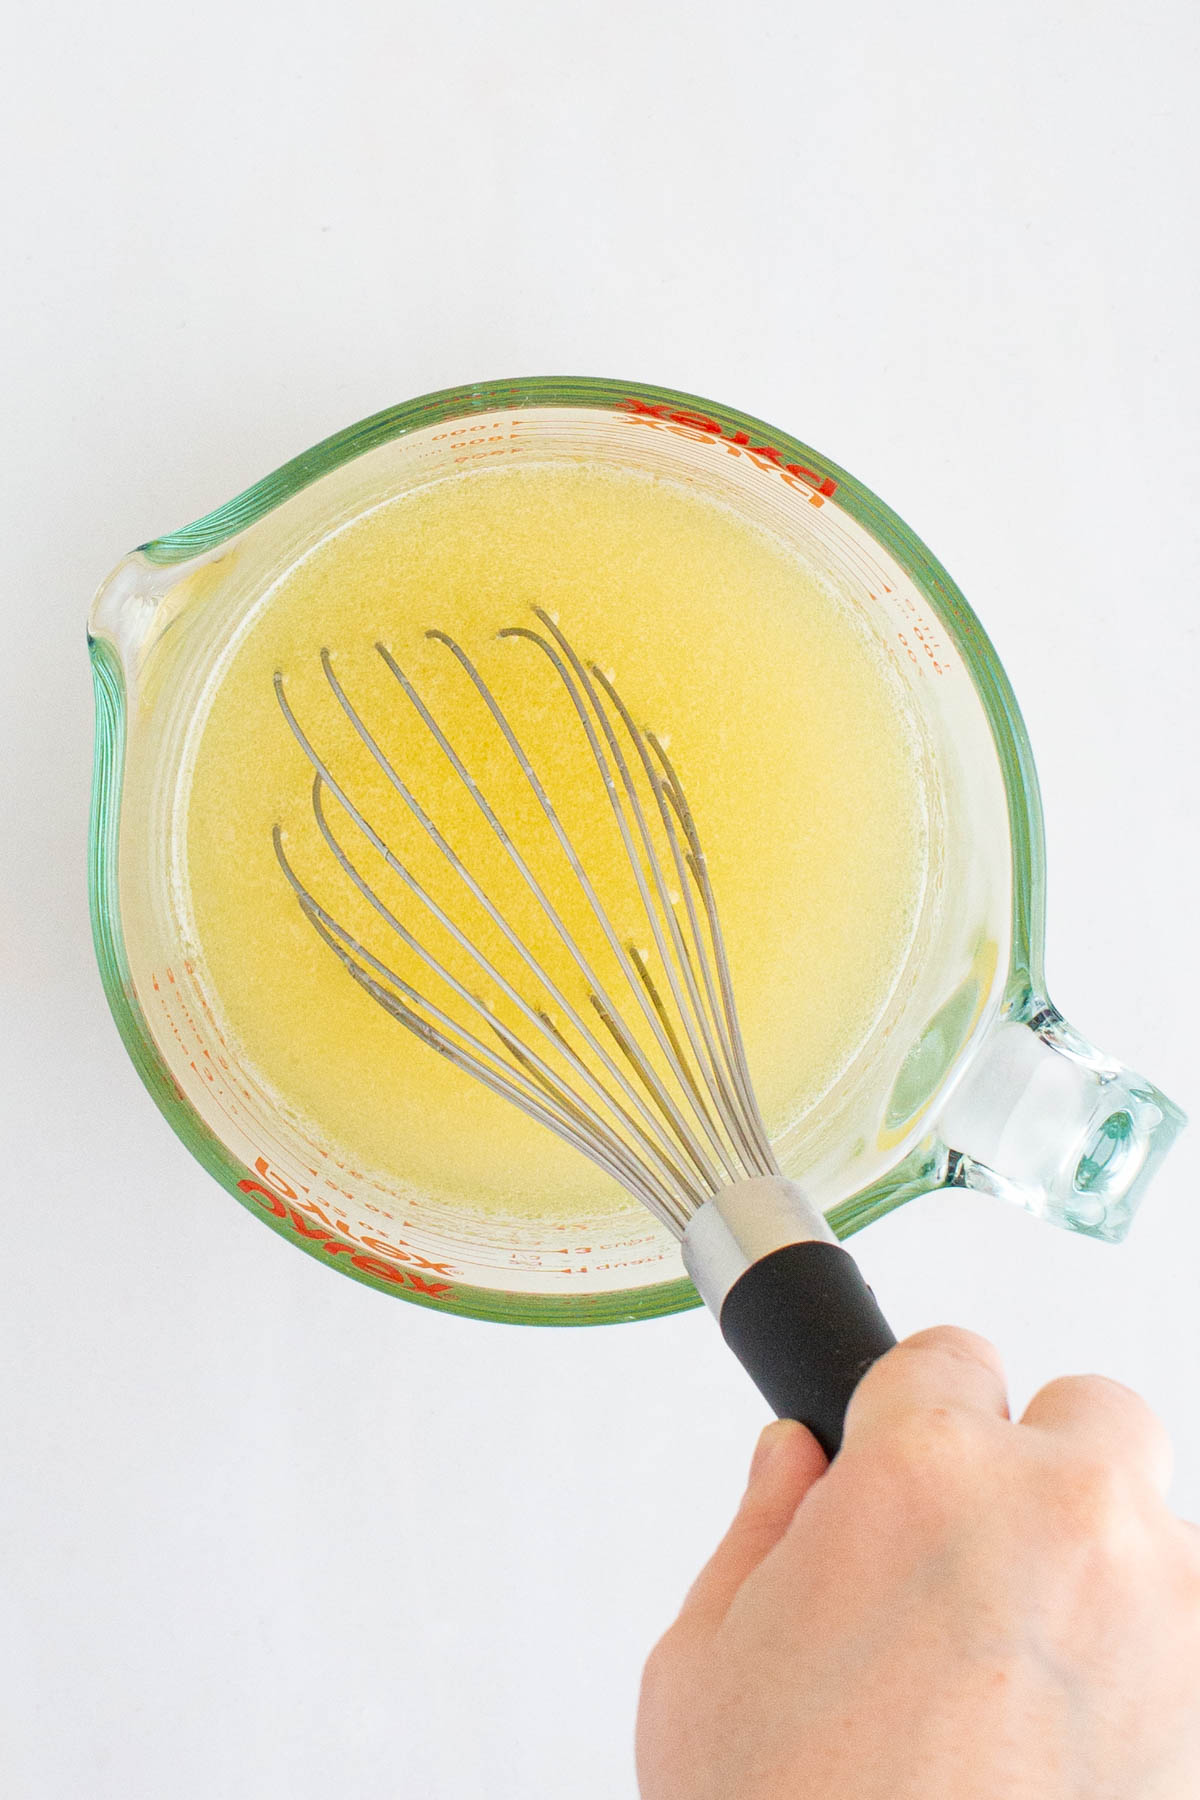
- Get the wet ingredients ready to pour: Whisk together warm water, melted butter, and honey in a measuring cup or bowl with a spout so it's easy to add to the bread dough.
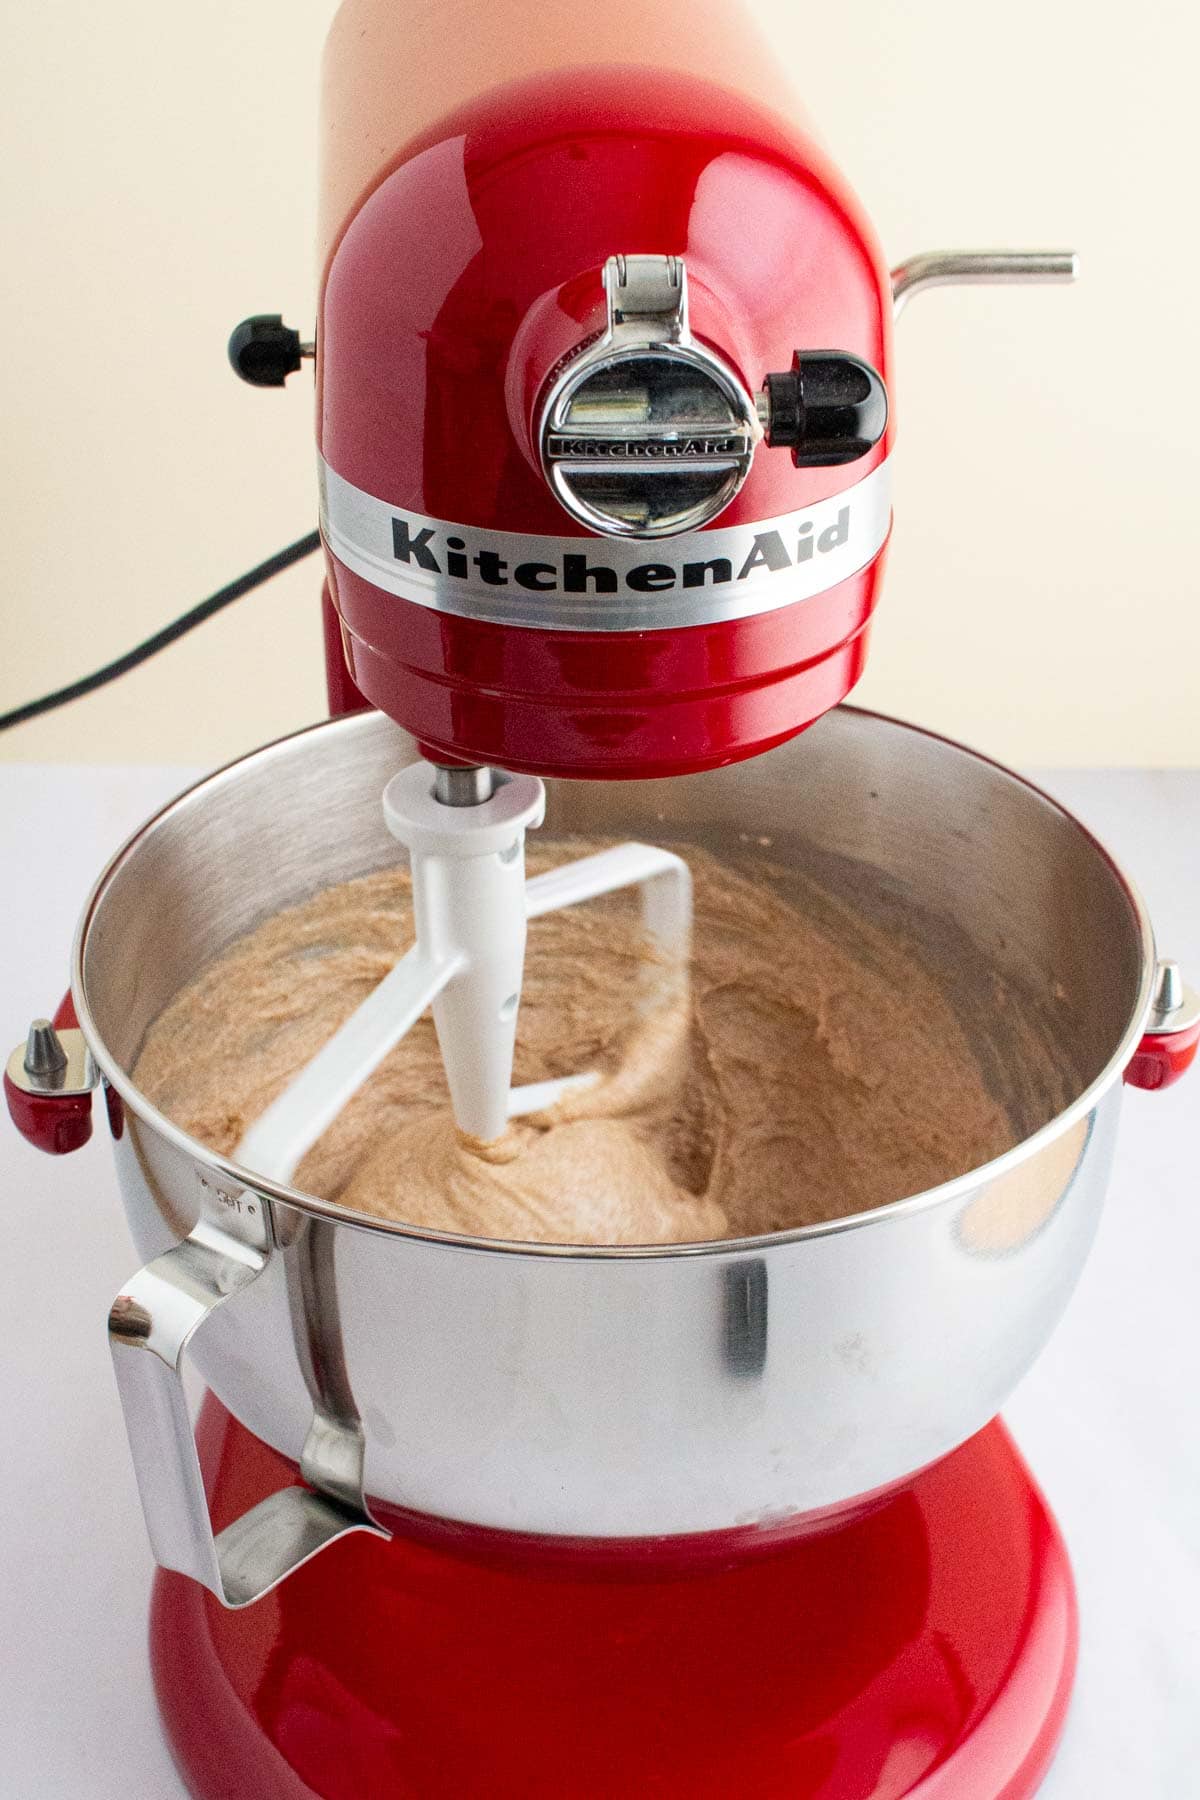
- Mix with a paddle: After adding the liquid ingredients, use your stand mixer's paddle instead of the dough hook to mix this high hydration, batter-style dough.
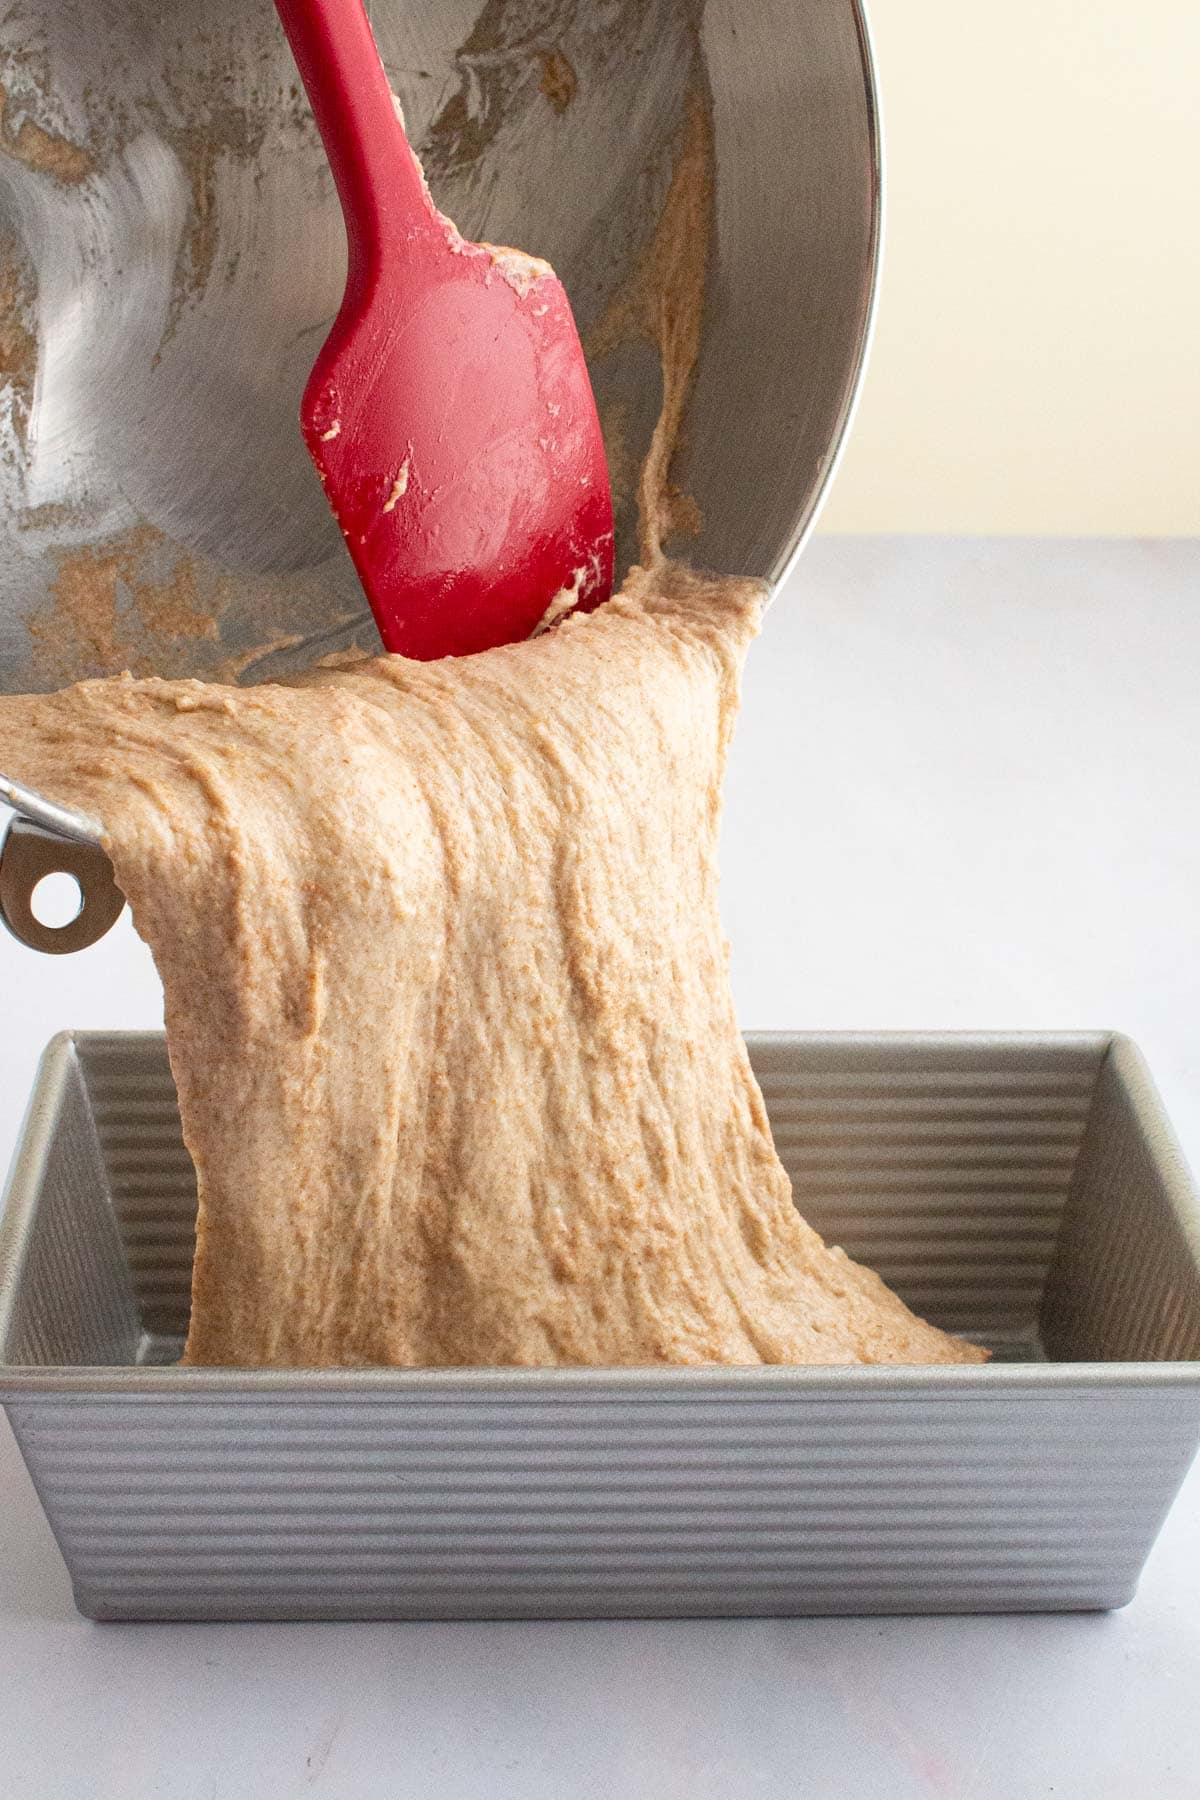
- Pour the batter: Scrape the dough straight from the mixer bowl into a greased loaf pan. (No need for shaping with this bread!)
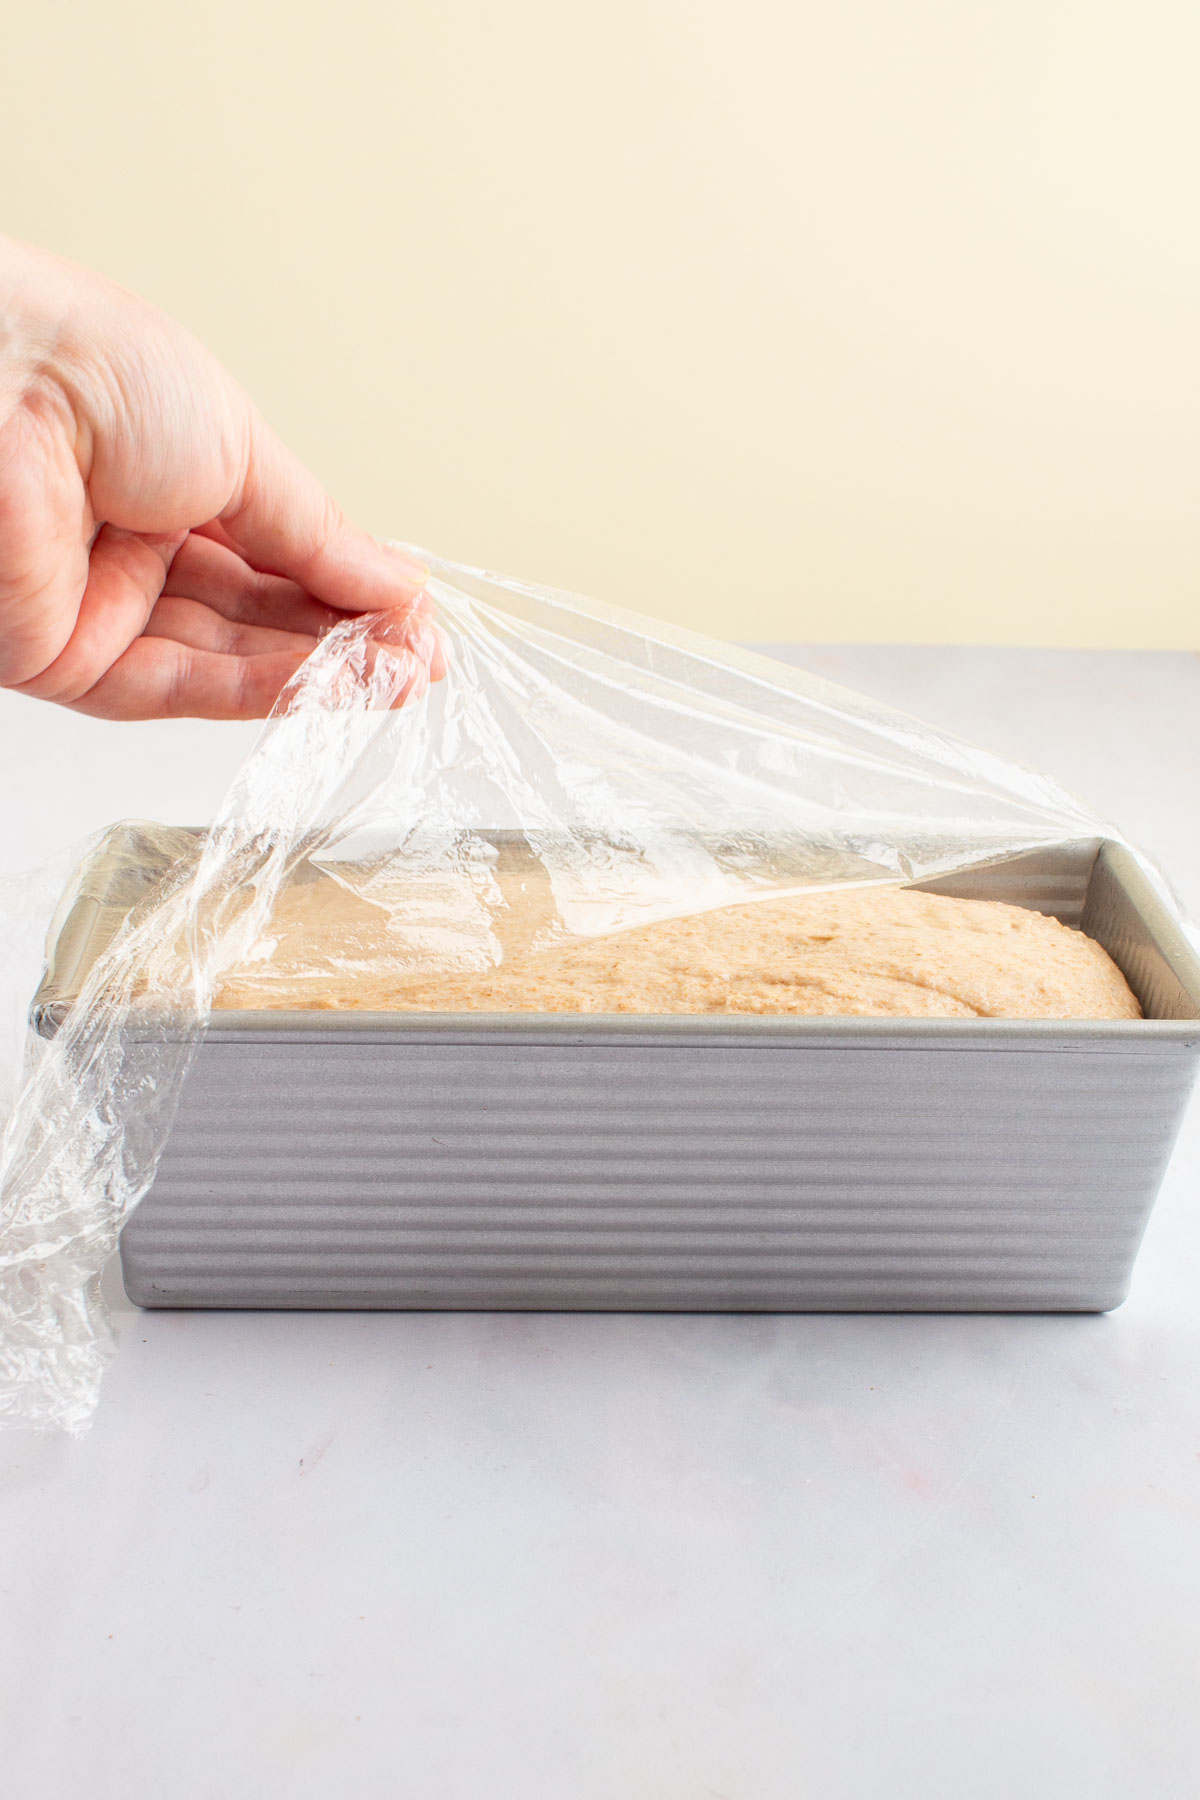
- Let it rise: Cover the dough with greased plastic wrap and let it rise until level with the pan, then gently remove the plastic.
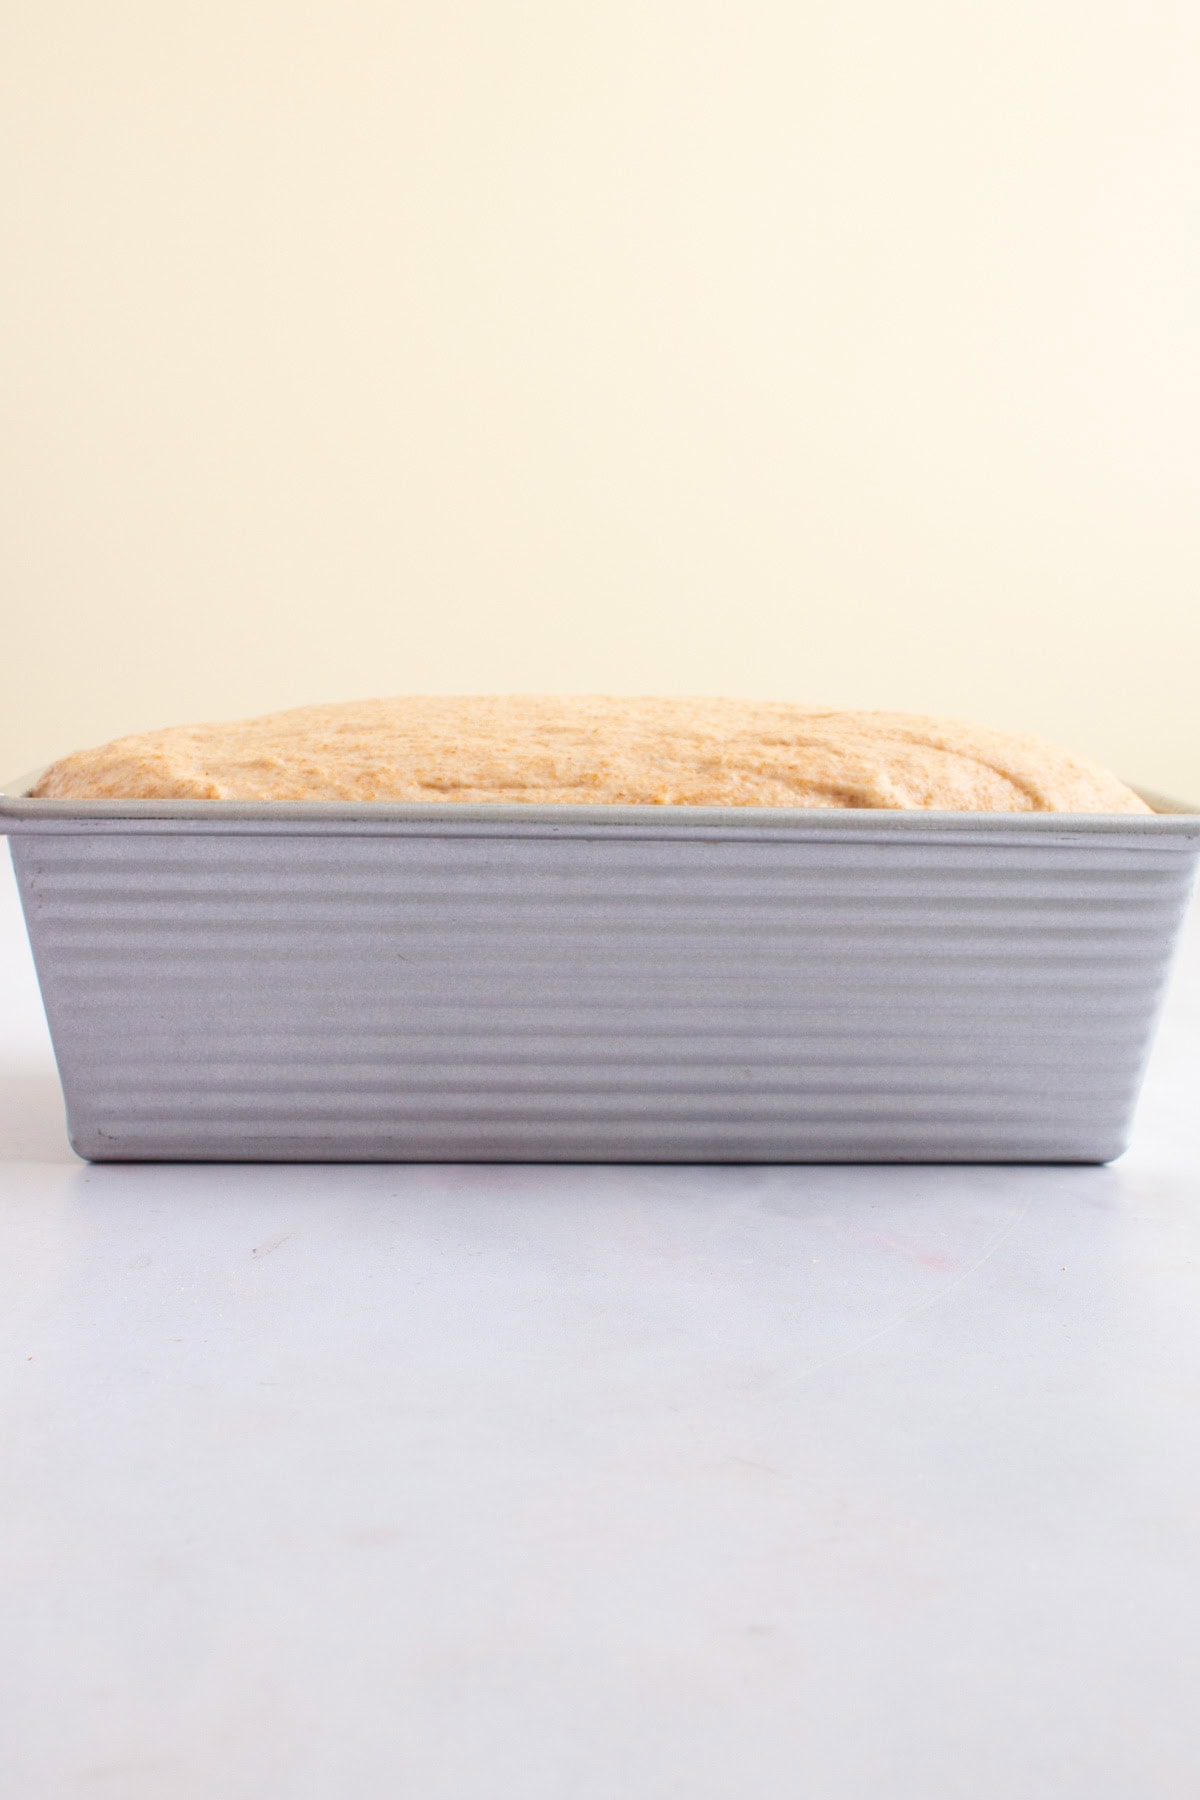
- And rise some more: Let the dough conitnue to rise, uncovered, until it's about a half-inch above the edge of the pan. (Don't let it go too much further than that, or it might overflow in the oven!)
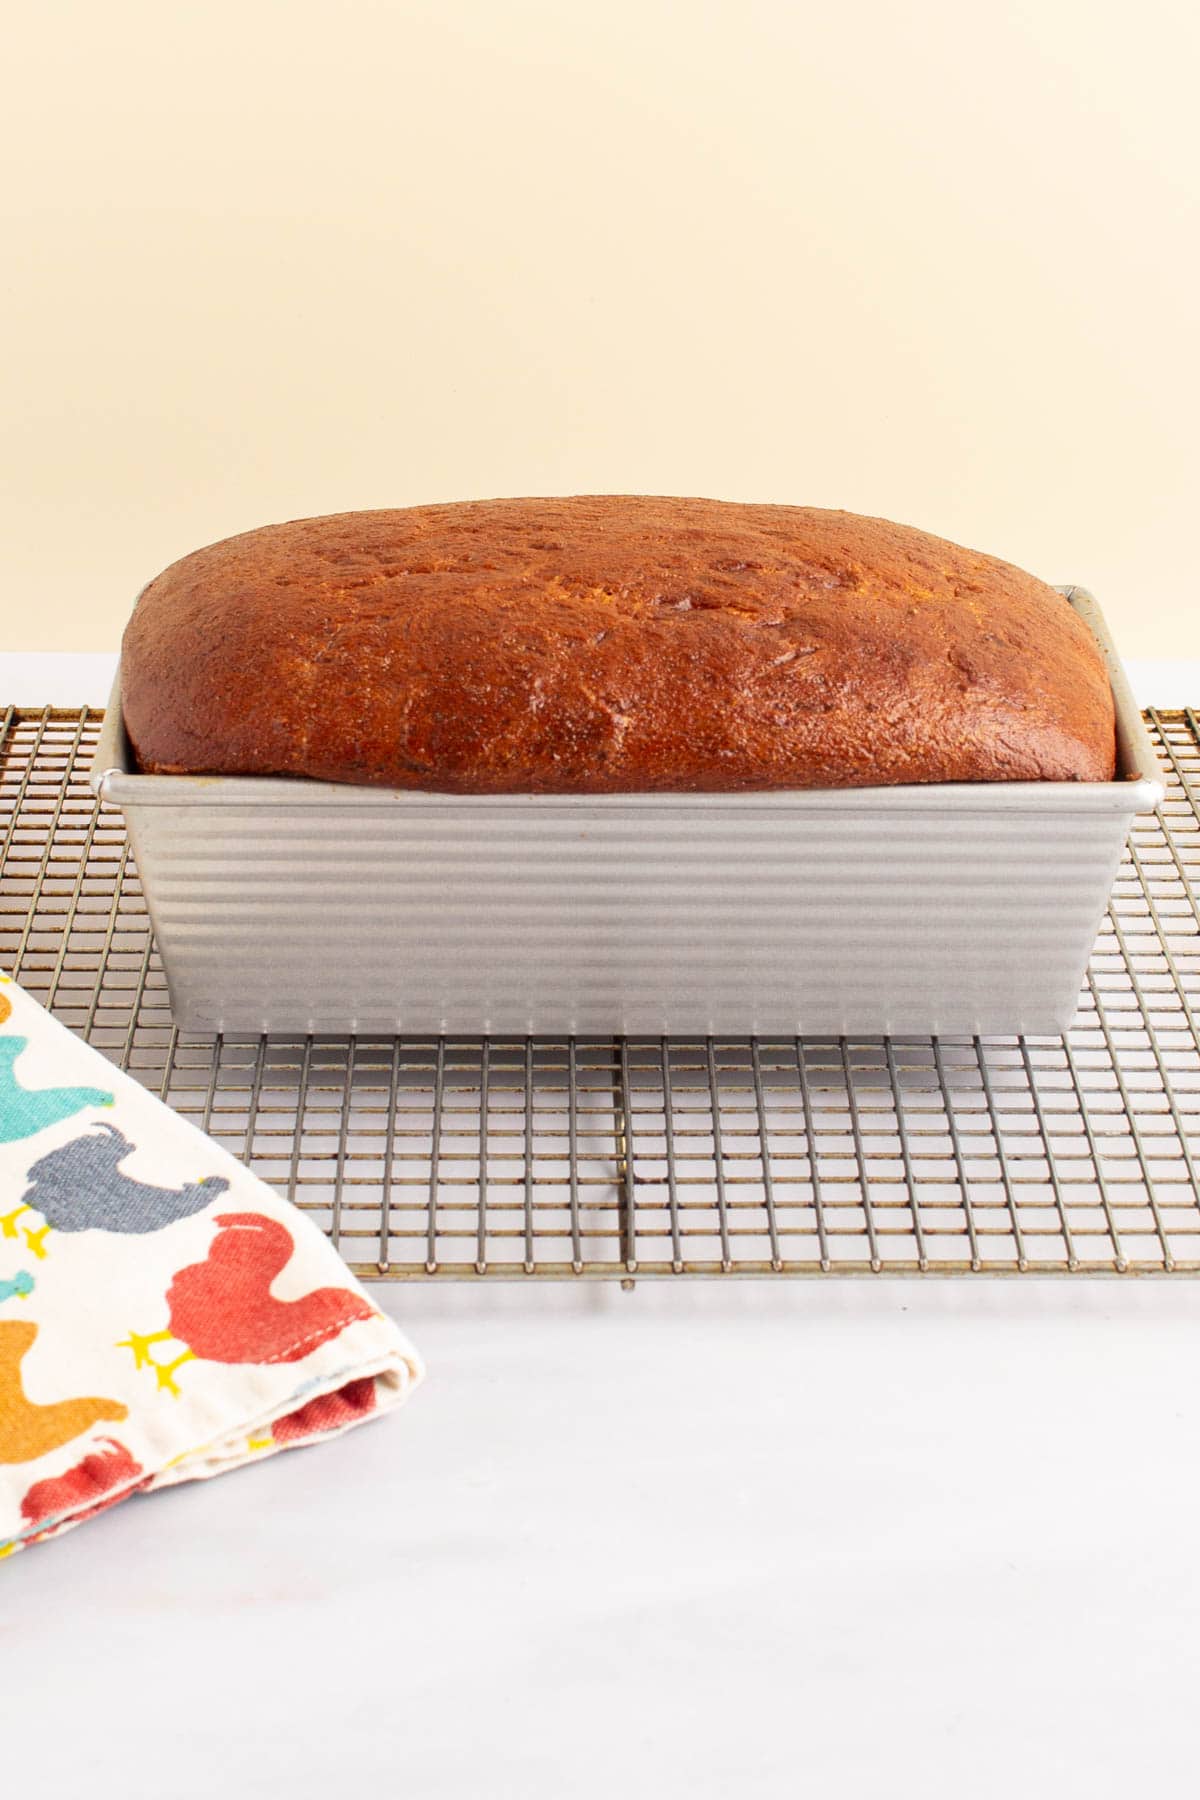
- Bake! After brushing with an egg wash, bake until the bread is deep golden brown and shiny. (Your kitchen will smell amazing!) Then, let the loaf cool on a cooling rack.
Why This Recipe Is Great for Kids
I've spent years writing cookbooks and creating recipes that are safe, fun, and engaging for kids and home cooks of all ages. Here are some key features of this recipe that make it perfect for kids and families to make together at home:
- Baking bread can be a long and labor-intensive process. This recipe for Easy Honey Wheat Sandwich Bread moves quickly for kids (and adults!) with shorter attention spans, and doesn't require any bread-baking know-how or technique. It's the easiest sandwich bread you'll ever make!
- Watching the bread dough rise in the pan is really fun, and kids can practice their estimation and measurement skills by observing when the bread is halfway up the pan, level with it, and half an inch above it.
- The sweetness from the honey might win over any skeptics of whole grains, but it's not too sweet. It's lovely as toast with butter or jam but also works for sandwiches or as a side dish for savory dishes.
Let's Cook!
Gather your equipment, measure your ingredients, and get cooking with this kid-friendly recipe! If you loved making it together, please leave five stars and share your stories in the comments.
Easy Honey Wheat Sandwich Bread
Good To Know
- If you have a kitchen scale, this is a great opportunity to use it. Weighing the flours and the water will give you the best results. Make sure to tare (or zero) the scale before measuring! Otherwise, just do your best to measure accurately by volume.
- Make sure to use instant or rapid-rise yeast in this recipe, not active dry yeast, as they work differently.
- If you don’t have a microwave, you can heat up the water and butter in a small saucepan on the stovetop, then transfer it to the measuring cup or bowl with a spout for easy pouring into the mixer.
- If your loaf pan is larger than 8 ½-by-4 ½ inches, start checking your bread for doneness 5 minutes early.
Equipment You'll Need
- Stand mixer with paddle attachment
- Whisk
- 4-cup liquid measuring cup or medium bowl with spout
- Instant-read thermometer (optional)
- 8 ½-by-4 ½-inch loaf pan (see note)
- Rubber spatula
- Plastic wrap
- Ruler (optional)
- Small bowl
- Fork
- Pastry brush
- Oven mitts
- Cooling rack
- Butter knife
- Cutting board
- Bread knife
Measure Your Ingredients
- 1 ½ cups whole-wheat flour (8 ¼ ounces)
- 1 cup bread flour (5 ½ ounces)
- 2 ¼ teaspoons instant or rapid-rise yeast
- ¾ teaspoon table salt
- 1 ½ cups water (12 ounces)
- 2 tablespoons unsalted butter, cut into 4 pieces
- ¼ cup honey
- Cooking spray
- 1 large egg
- 1 tablespoon water
Let's Cook!
- 1 ½ cups whole-wheat flour, 1 cup bread flour, 2 ¼ teaspoons instant or rapid-rise yeast, ¾ teaspoon table saltIn the bowl of a stand mixer fitted with the paddle attachment, whisk together the whole wheat flour, bread flour, yeast, and salt. Lock the mixer bowl into place.
- 1 ½ cups water, 2 tablespoons unsalted butter, cut into 4 pieces, ¼ cup honeyIn a 4-cup liquid measuring cup or a medium microwave-safe bowl with a spout, combine the 1 ½ cups water and the butter. Heat in the microwave until the butter is melted and the water is hot, about 2 minutes. Add the honey and whisk until the honey dissolves. Let cool until just warm, 5 to 10 minutes (if you have an instant-read thermometer, you can check the temperature; make sure it’s not more than 130°F, which will be too hot for the yeast).
- Start the mixer on low speed. Slowly pour the warm water mixture into the flour mixture in a thin stream and mix until a sticky dough forms, about 1 minute. Increase the speed to medium and mix the dough for 5 minutes. Stop the mixer.
- Cooking spraySpray the inside of an 8 ½-by-4 ½-inch loaf pan and a rubber spatula with cooking spray. Use the greased spatula to scrape down the paddle and the sides of the bowl. Scrape the dough into the greased loaf pan. Use the spatula to push the dough into the corners of the pan and spread it into an even layer. Spray a piece of plastic wrap with cooking spray, then drape it loosely over the loaf pan.
- Let the dough rise until it’s level with the edge of the pan, 30 to 45 minutes. Meanwhile, set your oven rack to the middle position and heat the oven to 350 degrees.
- Very gently remove the greased plastic wrap from the loaf pan, being careful not to rip the surface of the dough if the plastic wrap has stuck to it. Let it continue to rise until it’s about ½ inch above the top edge of the loaf pan, 10 to 20 minutes. (Keep an eye on it! If the bread dough rises too far above ½ an inch from the edge, it can overproof and collapse in the oven.)
- 1 large egg, 1 tablespoon waterWhile the dough rises, crack the egg into a small bowl and add the water. Use a fork to beat the egg and remaining 1 tablespoon water together until well combined.
- When the bread dough is ready, use a pastry brush to gently paint the top of the loaf with the beaten egg mixture.
- Place the loaf pan in the preheated oven. Bake until the bread is deep golden brown, 45 to 55 minutes.
- Use oven mitts to remove the loaf pan from the oven and place it on a cooling rack. Let the bread cool in the pan for 15 minutes.
- Use a butter knife to carefully loosen the edges of the bread from the loaf pan (the pan will still be hot). Use oven mitts to carefully turn the pan on its side and tip the bread out onto the cooling rack. Stand the bread back up and let it cool for at least 1 hour.
- Transfer the bread to a cutting board and use a bread knife to cut it into slices (make sure an adult helps with this). Serve warm or room temperature.
Conversation Starters
As you wait for your bread to rise, bake, and cool, talk about The Little Red Hen and what it was like to make the recipe together. You can help young readers make connections to the book and share your own answers, ideas, and stories with them with the following prompts:
- Have you ever baked bread before? If so, what other kinds of bread have you made? And what kind would you like to make next?
- How did the bread dough change over time as you mixed it, let it rise, and baked it?
- Do you think it was fair for the Little Red Hen not to share her loaf of bread with her other animal friends at the end of the story? Why or why not? Will you share your loaf of bread with anyone?

Rebecca Blackelari says
Delicious and simple!